

Table of contents
- What is Amazon EMR?
- Amazon EMR use cases
- Getting started with Amazon EMR
- Understanding Amazon EMR security options
- Amazon EMR and Apache YARN
- Frequently asked questions (FAQ)
What is Amazon EMR?
Amazon EMR, formerly known as Amazon Elastic MapReduce, is a managed cluster platform that makes it simpler to process and analyze massive volumes of data (big data) on AWS using big data frameworks such as Apache Hadoop and Apache Spark. Using these big data frameworks and related open-source projects, we can process data for analytics purposes and business intelligence applications.
EMR deployment options
Using Amazon EMR, we can deploy our workloads (applications) using:
- Amazon EC2 instance(s)
- Amazon Elastic Kubernetes Service (EKS)
- On-premises AWS Outposts
We can run and manage our workloads with the EMR Console, API, SDK or CLI and orchestrate them using Amazon Managed Workflows for Apache Airflow (MWAA) or AWS Step Functions. For an interactive experience, EMR Studio or SageMaker Studio can be used.
Amazon EMR also enables the transformation and movement of huge quantities of data into and out of other AWS data storage and databases, such as Amazon S3 and Amazon DynamoDB.
EMR file systems
The following are the two primary file systems that are used with Amazon EMR. We specify which file system to use by the prefix of the URI used to access the data.
- HDFS - Uses either
hdfs://as prefix or no prefix - EMRFS - Uses
s3://as prefix
EMRFS file system: EMRFS is an implementation of the Hadoop file system used for reading and writing regular files from Amazon EMR directly to Amazon S3.
Amazon EMR use cases
The following are the use cases:
- Perform big data analytics
- Build scalable data pipelines
- Process real-time data streams
- Accelerate data science and ML adoption
Getting started with Amazon EMR
In this post, we’ll look at how to set up and launch an Amazon EMR cluster on EC instances. It is beyond the scope of this post to look at how to set up an EMR cluster on EKS or on-premises with AWS Outposts.
Prerequisite
Before launching an Amazon EMR cluster, the following actions must be completed:
- Sign up for AWS
- Create an Amazon EC2 key pair for SSH into it - To authenticate and connect to the nodes in a cluster over the SSH protocol, we need to create an EC2 key pair before we launch the cluster.
Amazon EC2 key pairs: A key pair, consisting of a public key and a private key that we use to prove our identity when connecting to an Amazon EC2 instance. Amazon EC2 stores the public key on our EC2 instance (in an entry within
~/.ssh/authorized_keysfile), and we (client apps) store the private key. Note that Amazon EC2 doesn’t keep a copy of our private key.
Creating Amazon EMR cluster
EMR is built upon a cluster, which is a collection of E2 instances. These instances are generally called nodes. There are different types of nodes in the cluster, each of which has different roles.
Amazon EMR node types
There are three types of nodes in an EMR cluster:
- Master node (At least one master node)
- Core node (one or more core nodes)
- Task node (optional i.e., zero or more task nodes)
Let’s go over each node type in detail.
Master node
The master node supervises the cluster and typically runs master application components of distributed applications. For instance, the master node runs the YARN ResourceManager service to manage application resources. It also runs the HDFS NameNode service, tracks the status of jobs submitted to the cluster, and monitors the health of the instances.
To monitor the progress of a cluster and interact directly with applications, we can connect to the master node over SSH as the Hadoop user. Connecting to the master node enables direct access to directories and files, such as Hadoop log files.
Key takeaways
- Master node distribute data and tasks among nodes.
- Tracks the status of tasks.
- Monitors the health of the cluster.
- Master node is a must-have node type.
Multiple master nodes: With Amazon EMR 5.23.0 or later, it is possible to configure a cluster with three master nodes to offer high availability for applications such as YARN Resource Manager, HDFS NameNode, etc. With this capability, the master node is no longer a potential single point of failure.
Core nodes
Core nodes are managed by the master node. Core nodes run the Data Node daemon to coordinate data storage as part of the Hadoop Distributed File System (HDFS). In addition, they run the Task Tracker daemon and perform other parallel processing tasks on data required by installed apps. For example, a core node runs YARN NodeManager daemons, Hadoop MapReduce tasks, and Spark executors.
There is only one core instance group per cluster, however the instance group may include many nodes operating on several Amazon EC2 instances. With instance groups, we can add and remove EC2 instances while the cluster is running. We can also set up automatic scaling to add instances based on the need.
Key takeaways
- Core node runs the actual data processing tasks via Hadoop aplication services such as Hive, Pig, HBase, and Hue.
- Core nodes are responsible for storeing the data.
- In case of multi-node cluster, we should have at least one core node.
Task nodes
We can utilize task nodes to increase the processing capability of parallel computing jobs on data, such as Hadoop MapReduce tasks and Spark executors.
Note: Task nodes neither execute the Data Node daemon nor store data in HDFS.
Key takeaways
- Task nodes are optional.
- Task node runs the actual data processing tasks.
- Task nodes are useful when we plan to increase our cluster capacity for a specific job and scale down after its completion.
- But doesn’t store the data i.e., do not have HDFS storage.
We’ve learned about the various types of nodes. Launching an Amazon EMR cluster can be accomplished in one of two methods, depending on our preferences and needs:
- Launch via the AWS Management Console
- Launch via the AWS Command Line Interface (AWS CLI)
Launch via the AWS Management Console
Follow the key steps outlined below to create an EMR cluster in AWS Management Console:
- Login into AWS Management Console.
- Go to Services and select EMR. It will take us to the EMR’s home screen.
- Click on Create cluster.
- Click Go to advanced options if we want to select specific frameworks or tools as shown in Figure 1 below.
- Select the type of step to be submitted to the EMR cluster (Optional).
- Configure instance group or instance fleet - We specify the configuration of the master, core and task nodes as an instances group or instance fleet.
- Select either one of the instance group configurations: Uniform instance groups or instance fleet.
- Configure cluster nodes and instances.
- Give a name to the cluster.
- Under Security Options, choose the EC2 key pair we created earlier.
- Click on Create cluster button.
It may take a few minutes to launch the EMR cluster after we have clicked the “Create cluster” button. The launch time is determined by a variety of factors, including the number of cluster nodes, the number of applications and frameworks that we have chosen, and so on.
 |
|
|---|---|
| Figure 1: Amazon EMR - Adanced options. |
 |
|
|---|---|
| Figure 2: Amazon EMR - Adanced options: Cluster Nodes and Instances. |
Create a cluster with instance fleets or uniform instance groups
When creating an EMR cluster and specifying the configuration of the master node, core nodes, and task nodes, we have one of the two available configuration choices:
- Uniform instance groups
- Instance fleets
The configuration option we choose is applicable to all nodes for the lifetime of the cluster. It’s important to note that in a cluster, instance fleets and instance groups cannot coexist. We can only choose one of these.
Instance fleet
The instance fleets configuration offers the widest variety of provisioning choices for Amazon EC2 instances. Each node type (master/core/task node) has a single instance fleet, and it is optional to use task instance fleet. Up to 5 EC2 instance type (General purpose instance type, compute optimized instance type, etc.) per fleet. If the cluster is created using the AWS CLI or Amazon EMR API, we can have up to 30 EC2 instance types per fleet.
Uniform instance groups
Uniform instance groups offer a simpler setup than instance fleets. When we are creating an EMR cluster, we have the flexibility to group different instance types and assign core or task node roles to them. Because of this, we are not limited to choosing a single instance type for our whole cluster.
In general, we are able to use a variety of EC2 instance types for the master node, the core nodes, and the task nodes. This could benefit by autoscaling our cluster in a more effective manner. For example, the task nodes won’t have HDFS, so the instances they use will have greater compute and memory capacity but lower disk capacity. This is because the task nodes won’t have HDFS.
Each Amazon EMR cluster can include up to 50 instance groups:
- One master instance group that contains one Amazon EC2 instance.
- A core instance group that contains one or more EC2 instances.
- Up to 48 optional task instance groups.
Each core and task instance group can contain any number of Amazon EC2 instances. We can scale each instance group manually by adding and removing Amazon EC2 instances, or we can set up automatic scaling.
Having said that, instance groups give us much control and flexibility.
Launch via the AWS CLI
We are now aware of how to create and launch an Amazon EMR cluster using the AWS Management Console. Now, let’s create the same using the AWS CLI.
Prerequisites
- IAM user
- AWS CLI must be installed and configured via
aws configurecommand on the client machine to connect to AWS services. Refer here to learn more about how to install and configure the AWS CLI.
On the termical, type the following aws command:
$ aws emr create-cluster --name emr-cluster-demo \
--use-default-roles \
--release-label emr-6.7.0 \
--instance-count 3 \
--instance-type c4.large \
--applications Name=Spark Name=Hadoop Name=Spark Name=Livy \
--ec2-attributes KeyName=<NAME OF KEY PAIR WITHOUT .pem or .ppk EXTENSION> \
--log-uri s3://<S3 BUCKET NAME>
Arguments
Refer here for a complete list of arguments.
--name: Name of the EMR cluster.--user-default-roles: UsesEMR_DefaultRoleas default EMR role and usesEMR_EC2_DefaultRoleas default EC2 instance profile.--release-label: Create EMR cluster with the given EME version.--instance-count: Build 1 master node and n number of core nodes. For instance, if theinstance-countis3, then it builds with 1 master node and 2 core nodes.--instance-type: EC2 instance type e.g.m5.xlarge.--applications Name=<application name>: Installs the given applications or frameworks.--ec2-attributes KeyName=<key pair>: KeyName is the EC2 key pair to connect to EC2 instance. Do not provide the key pair file extension such as.pemor.ppk.--log-uri: Specifies the location in Amazon S3 to which log files are periodically written. If a value is not provided, logs files are not written to Amazon S3 from the master node and are lost if the master node terminates.
When we run the above AWS CLI command, we get similar output shown below, which includes the cluster id and cluster arn that were created:
{
    "ClusterId": "j-2KMYIITE20AWG",
    "ClusterArn": "arn:aws:elasticmapreduce:us-east-1:811587835183:cluster/j-2KMYIITE20AWG"
}
Using the ClusterId that was obtained by the previous emr create-cluster command, we can use the following command to check the status of the newly created cluster and find out more about it:
aws emr describe-cluster --cluster-id <ClusterId>
Authorize inbound traffic
Before we connect to an Amazon EMR cluster, we must authorize inbound SSH traffic (port 22) from trusted clients. In order to do so, edit the managed security group rules for the nodes (master or core nodes) to which we want to connect.
The steps that are shown below demonstrate how to include an inbound rule for SSH access inside the default ElasticMapReduce-master security group:
- Open the Amazon EMR console at https://console.aws.amazon.com/elasticmapreduce/.
- Choose Clusters.
- Choose the Name of the cluster we want to modify.
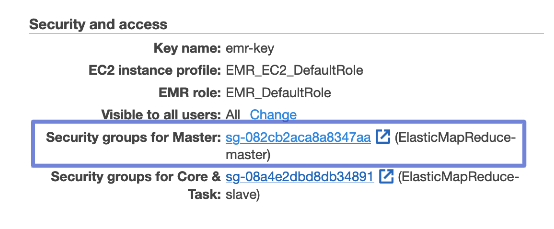
- Choose the Security groups for Master link under Security and access. Shown in Figure 3 below.
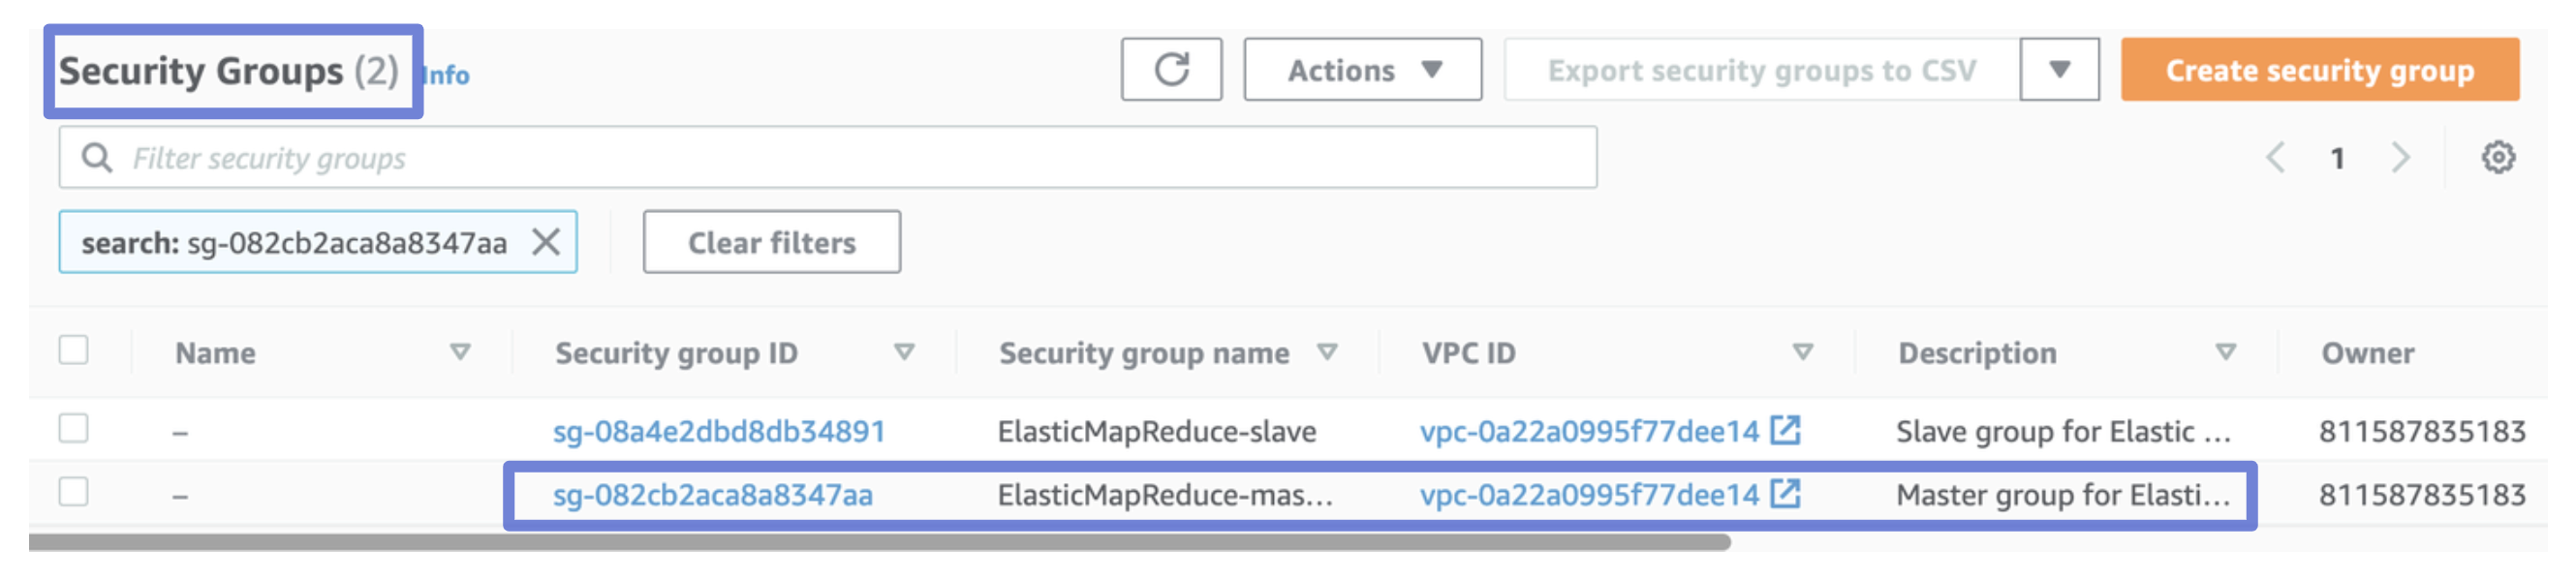
- Choose ElasticMapReduce-master from the list. Shown in Figure 4 below.
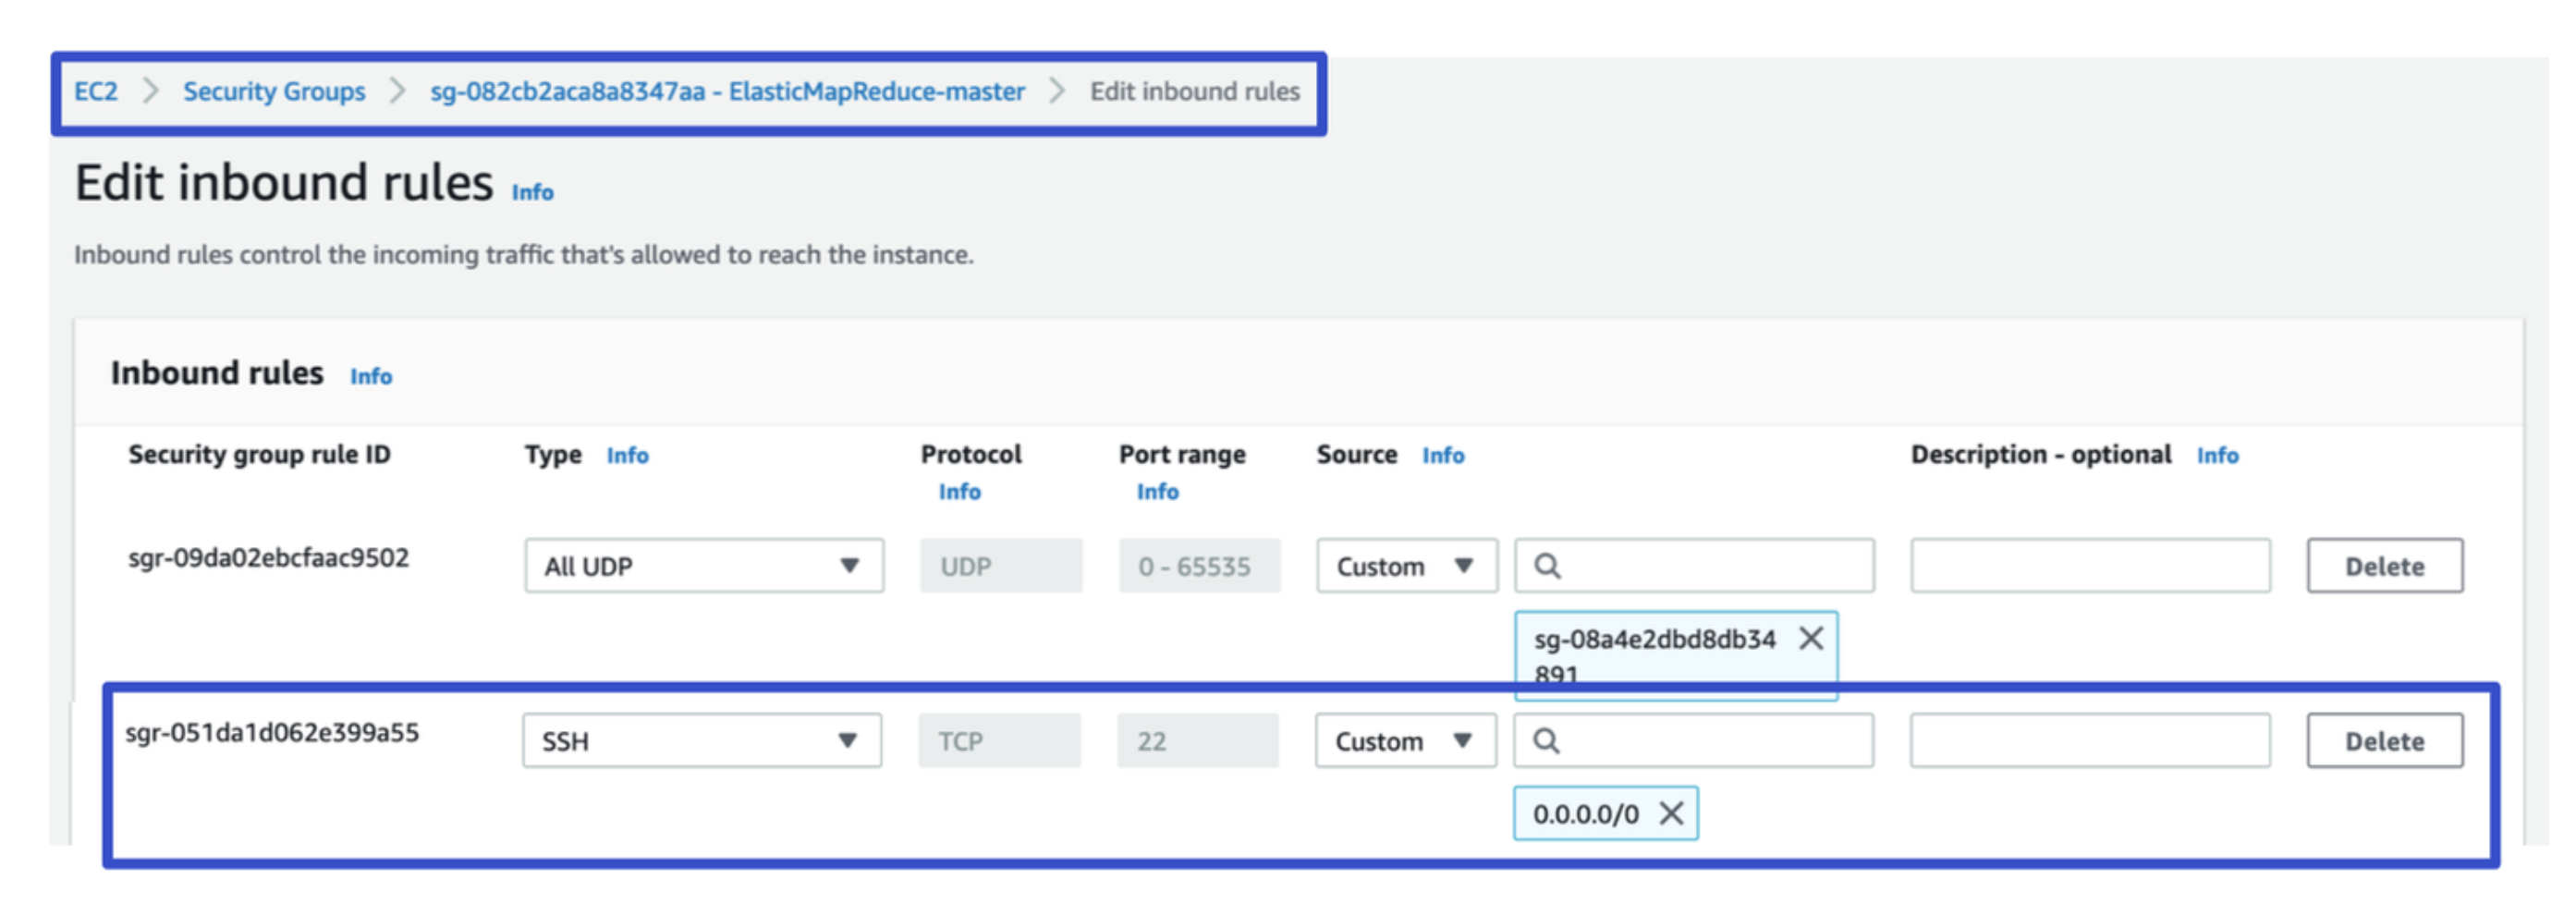
- Choose the Inbound rules tab and then Edit inbound rules.
- Check for an inbound rule that allows public access with the following settings. If it exists, choose Delete to remove it.
- Type SSH
- Port 22
- Source Custom 0.0.0.0/0
- Scroll to the bottom of the list of rules and choose Add Rule.
- For Type, select SSH. Selecting SSH automatically enters TCP for Protocol and 22 for Port Range. Shown in Figure 5 below.
- For source, select My IP to automatically add your IP address as the source address. You can also add a range of Custom trusted client IP addresses, or create additional rules for other clients. Many network environments dynamically allocate IP addresses, so you might need to update your IP addresses for trusted clients in the future.
- Choose Save.
- Optionally, choose ElasticMapReduce-slave from the list and repeat the steps above to allow SSH client access to core and task nodes.
 |
|
|---|---|
| Figure 3: Security groups for Master under Security and access. |
 |
|
|---|---|
| Figure 4: Edit ElasticMapReduce-master |
 |
|
|---|---|
| Figure 5: Added SSH 22 to inbound rules |
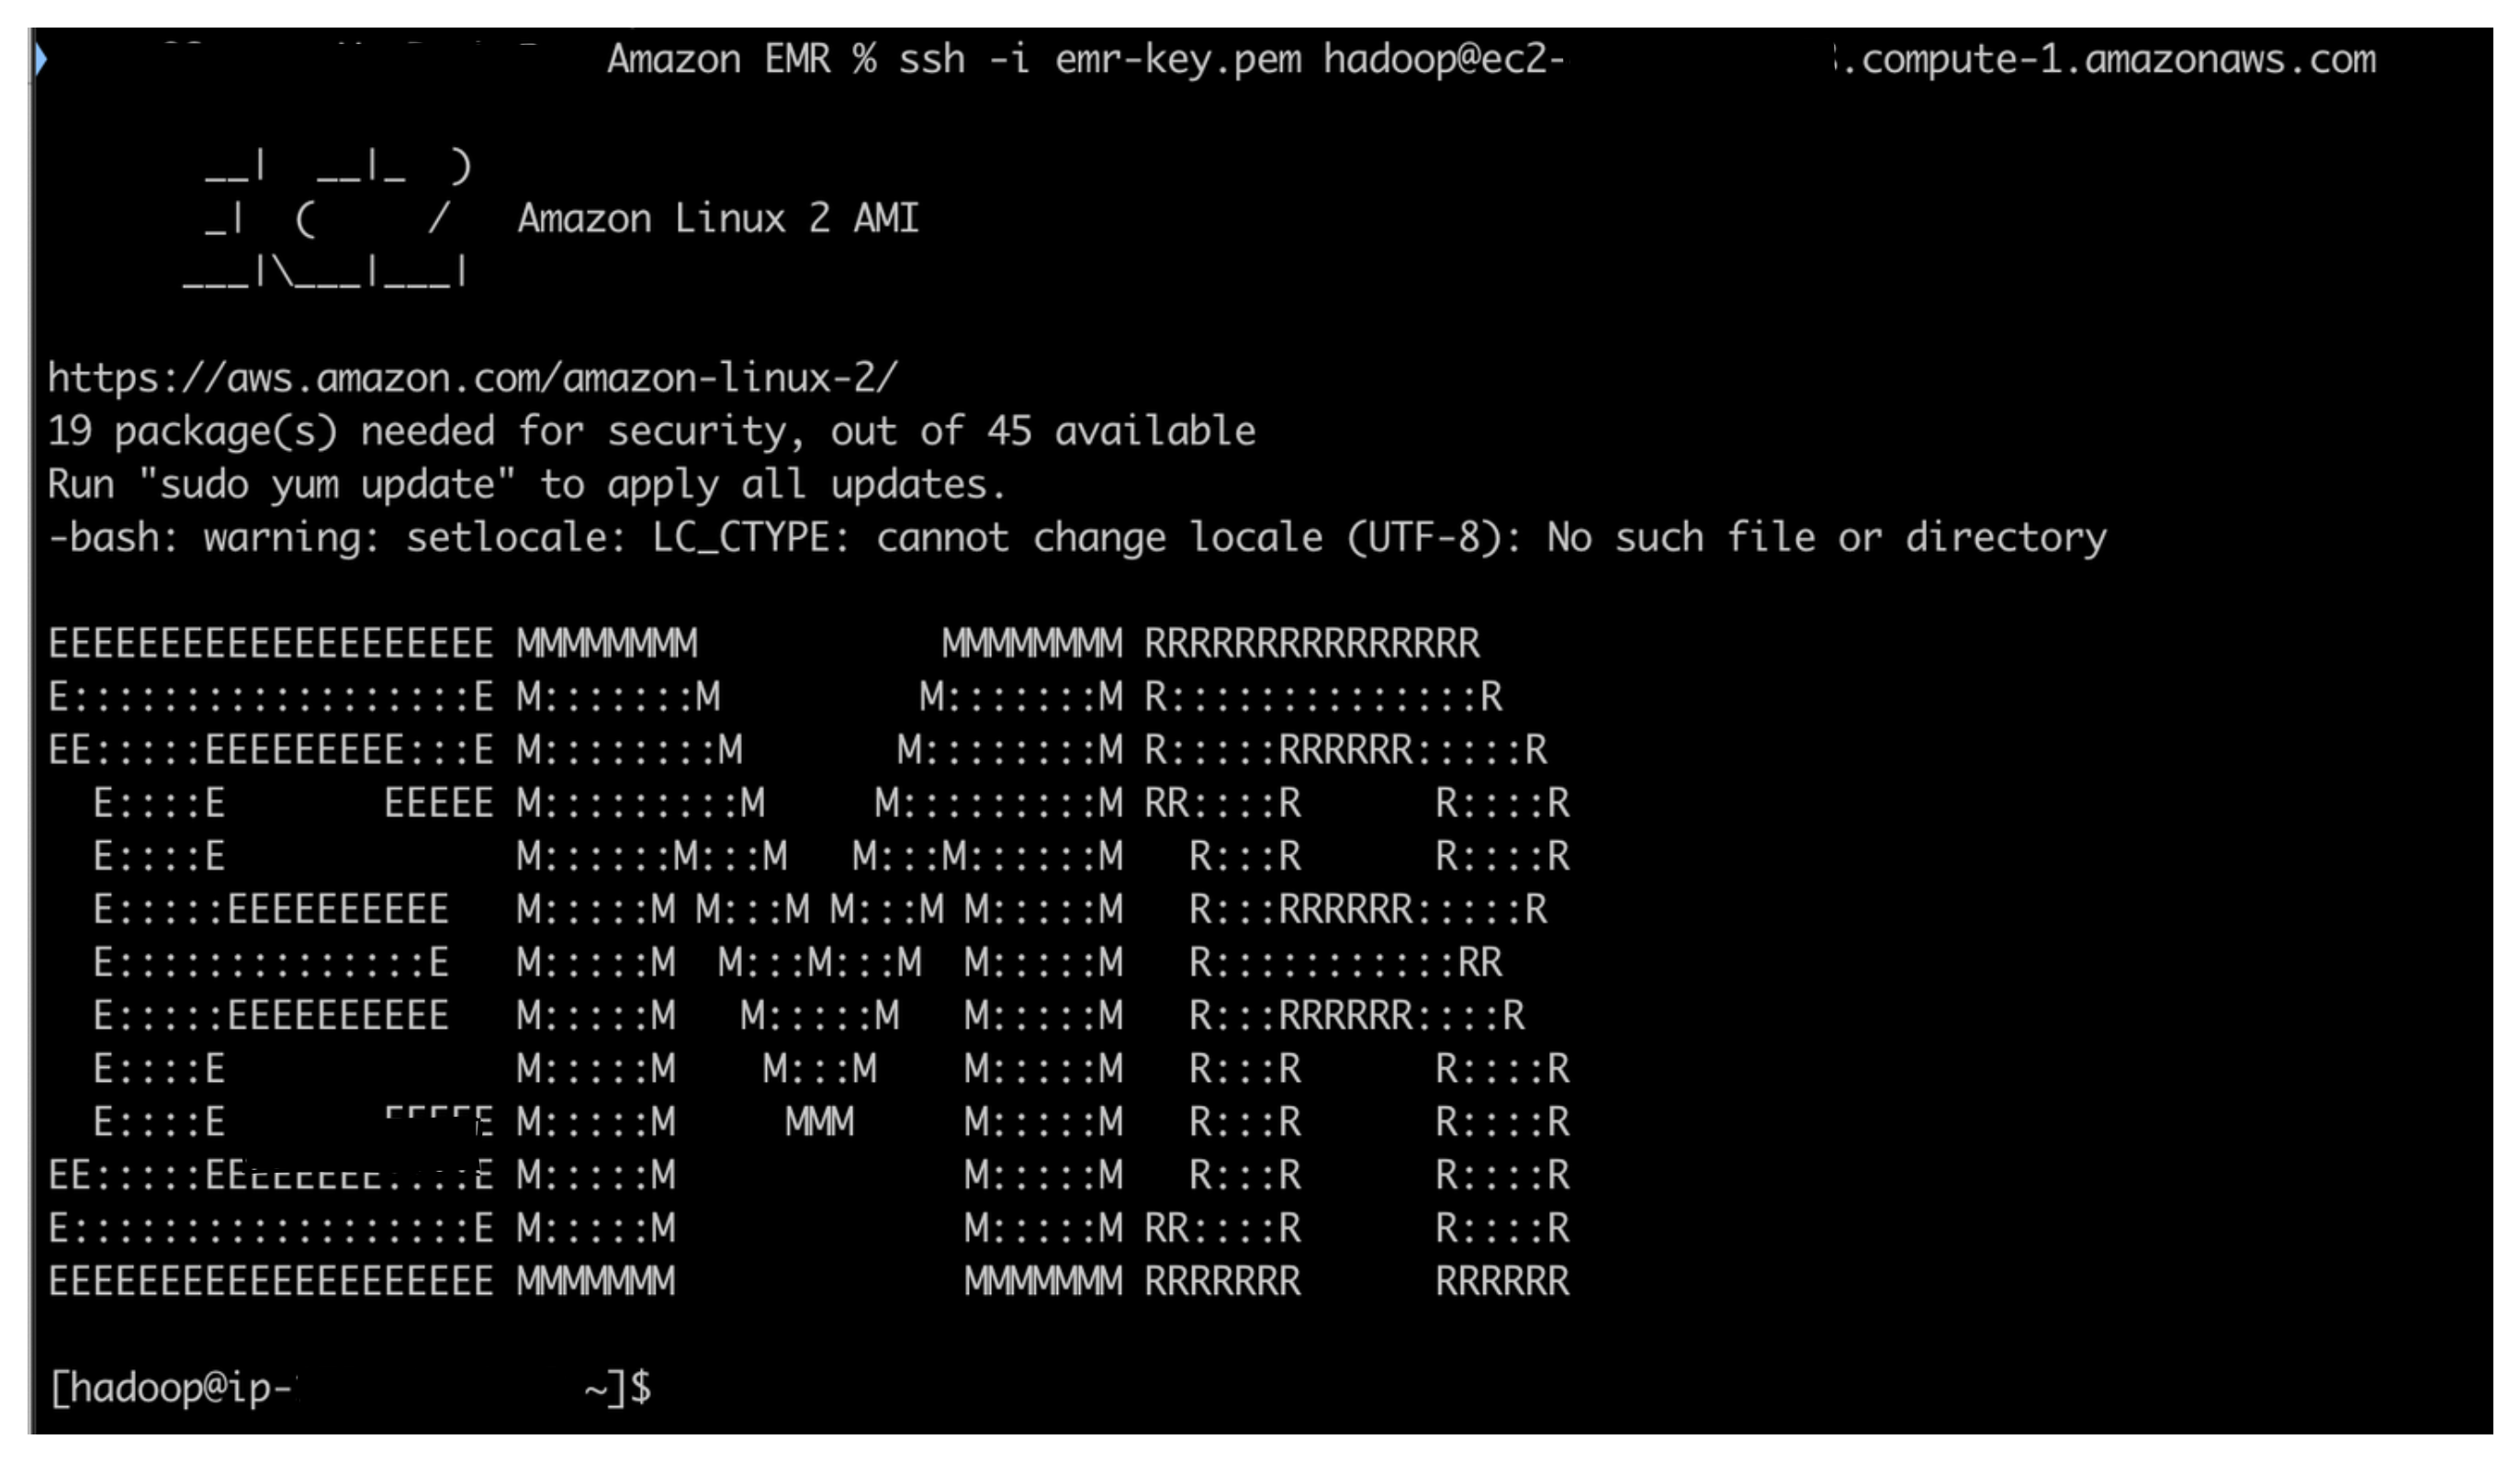
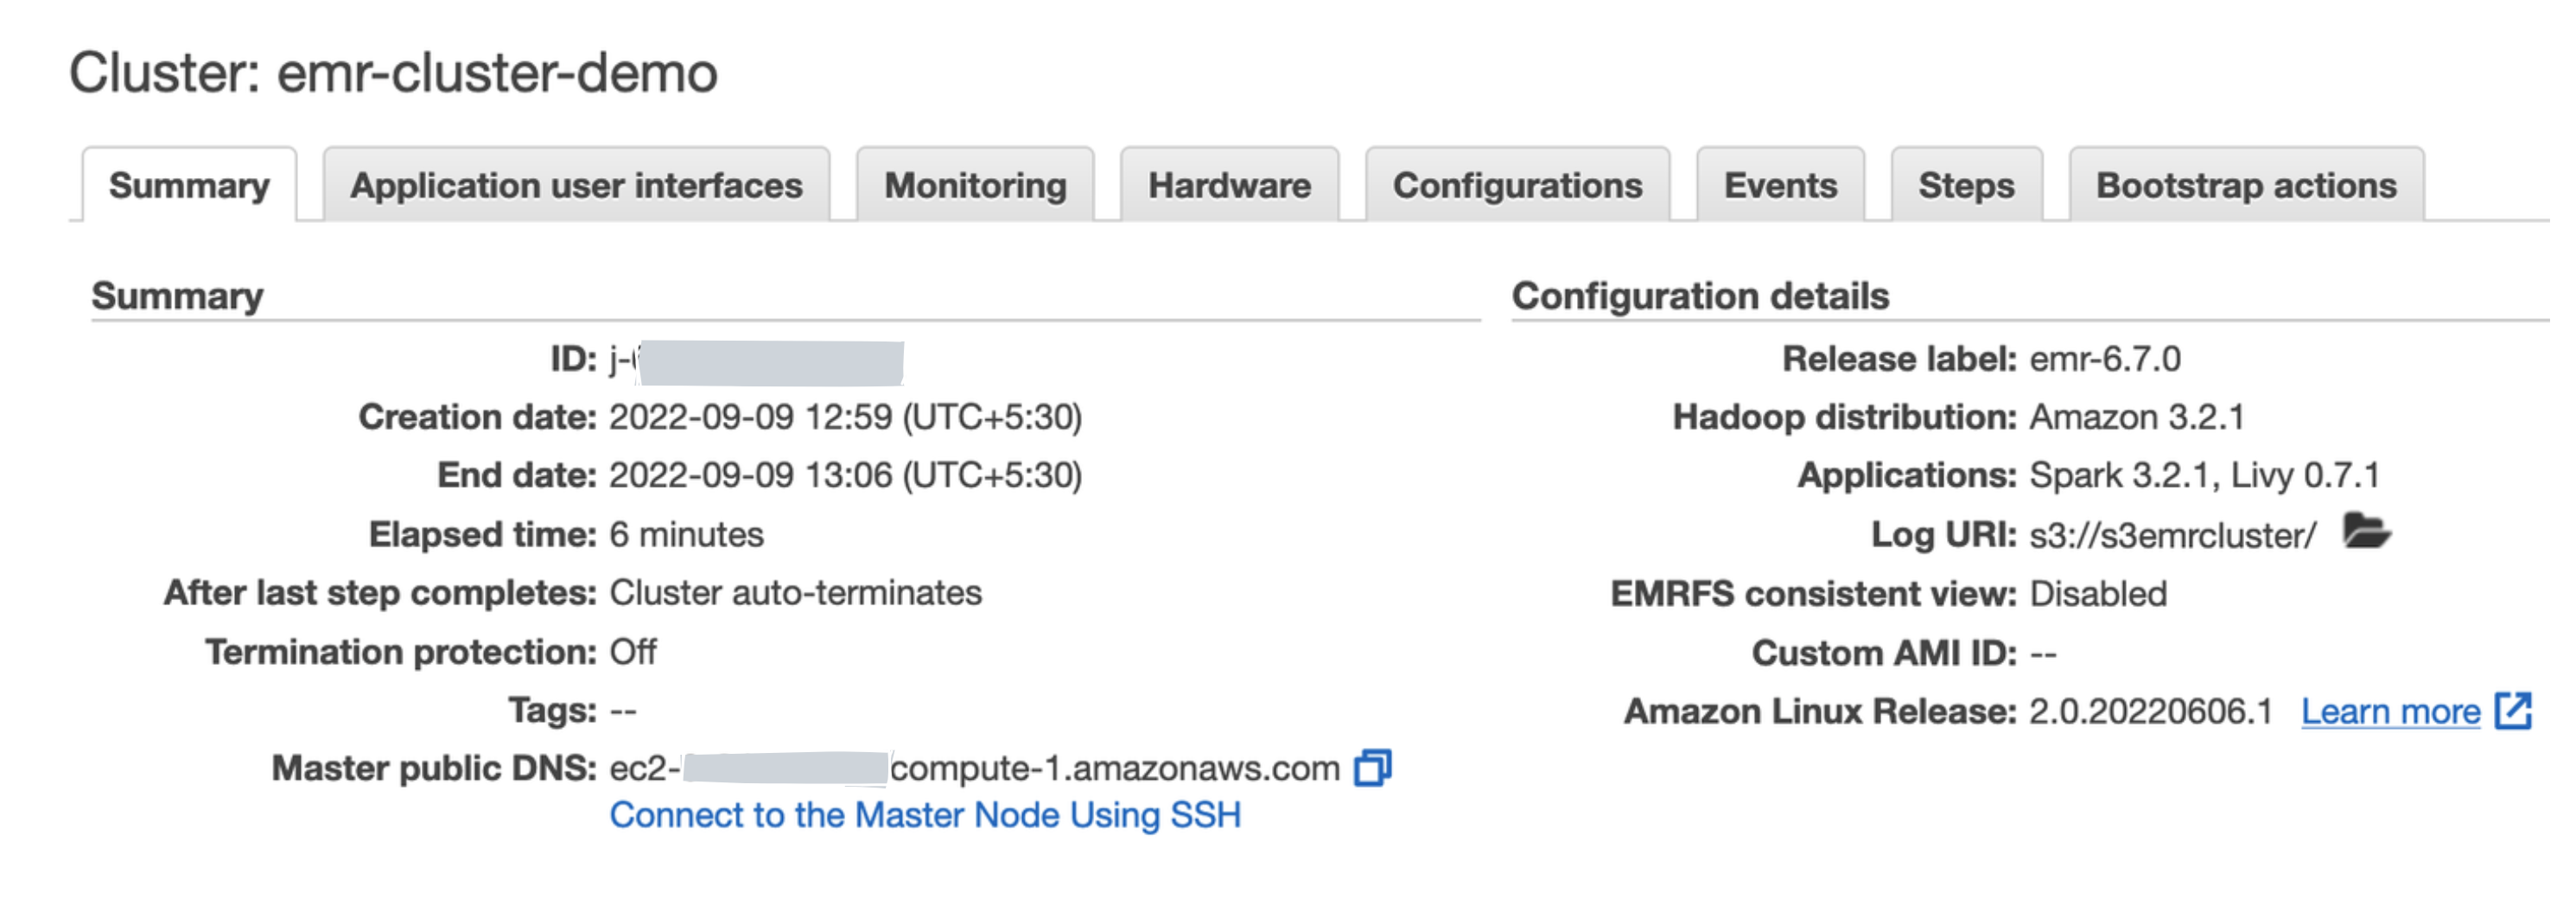
Now we should be able to SSH into the master node using the below command. We can find the master node’s public DNS from the Summary tab in the EMR console as shown in Figure 7 below.
ssh -i <key pair> hadoop@<EMR master public DNS>
Example: ssh -i my-emr-key.pem [email protected]
If we see the screen as shown below in Figure 7 with the name EMR in huge letter, it is wonderful because it indicates that we have successfully constructed and connected to the EMR cluster by using the AWS CLI.
 |
|
|---|---|
| Figure 6: SSHed into EMR EC2 node |
 |
|
|---|---|
| Figure 7: Finding master node’s public DNS |
Understanding Amazon EMR security options
In the Security Options section, we are provided with settings that allow us to select EC2 key pairs, IAM roles, security groups, and more. With these configurations, we are able to control who has access to the resources of our cluster and what privileges they have.
- EC2 key pair: A key pair, consisting of a public key and a private key that we use to prove our identity when connecting to an Amazon EC2 instance. Amazon EC2 stores the public key on our EC2 instance (in an entry within ~/.ssh/authorized_keys file), and we (client apps) store the private key.
- Permissions: By default, EMR creates three roles:
EMR_DefaultRoleas the EMR role. It calls or interacts with other AWS services, such as EC2, while creating the cluster.EMR_EC2_DefaultRoleas the EC2 instance profile. It provides access to cluster EC2 instances to access other AWS services such as Amazon DynamoDB, Amazon S3, and more.EMR_AutoScaling_DefaultRoleas the Auto Scaling role. It provides access to add or remove EC2 instances from the cluster when scaling up or down happens through managed scaling or auto scaling policies.
- Security configuration: This allows us to specify encryption and authentication options for our cluster. We need to create the configuration before creating the EMR cluster.
- EC2 security group: EC2 security groups provide firewall security for our AWS services’ inbound and outbound access. EMR establishes two security groups by default: one for the master node and another for the core and task nodes.
Amazon EMR and Apache YARN
YARN is one of the most important parts of Hadoop clusters since it not only helps to manage the resources of the cluster but also organizes the execution of jobs across multiple nodes. The core concept behind YARN is to split up the functionalities of resource management and job scheduling/monitoring into separate daemons.
YARN is used by the majority of Hadoop applications and frameworks in Amazon EMR by default; however, there are a few other applications and frameworks that do not utilize YARN to manage their resources. On each and every node in the cluster, EMR runs an agent that manages YARN components and communicates with Amazon EMR.
Note: It is important to keep in mind that while using spot instances, the chances of task failure are high as they get terminated because of resource unavailability. EMR allows running the ApplicationMaster only on core nodes in order to make jobs more fault-tolerant. This is done so that the ApplicationMaster will not be terminated if a spot node is terminated, and the ApplicationMaster will be able to trigger the failed task in another node.
EMR added a built-in YARN node label feature with the 5.19.0 release. With this feature, it labels core nodes with the CORE label, configures yarn-site and capacity-schedulers to utilize these labels, and ensures that the ApplicationMaster runs only these nodes.
Frequently asked questions (FAQ)
What exactly is meant by the term “key pair” when referring to Amazon EC2?
A key pair, also called an EC2 key pair, consists of a public key and a private key that we use to prove our identity when connecting to an Amazon EC2 instance using SSH. We can create a key pair using the AWS Management Console or the AWS CLI. Amazon EC2 stores the public key on our EC2 instance (in an entry within ~/.ssh/authorized_keys file), and we (client apps) store the private key.
What is termination protection?
When termination protection is enabled, the cluster cannot be terminated. Before terminating the cluster, termination protection must first be removed explicitly. This helps ensure that EC2 instances are not accidentally terminated. It prevents accidental termination of the cluster. Having said, to shut down the cluster, we must turn off termination protection.
Termination protection is especially helpful if our cluster stores data on local disks that we need to retrieve back before we terminate the instances.
What is auto-termination?
With auto-termination, we can set a timer to terminate the cluster after a period of inactivity or after out steps are done. This would allow us to save cost on unsed instances.
How to archive Amazon EMR cluster log files?
We an configure a cluster to periodically archive the log files stored on the master node to Amazon S3. This guarantees that the log files are available after the cluster has terminated, whether normally or as a result of an error.
Amazon EMR archives the log files to Amazon S3 at 5 minute intervals. To have the log files archived to Amazon S3, we must enable this feature when we launch the cluster:
 |
|
|---|---|
| Figure 3: Amazon EMR - Archiving cluster logs to S3. |
Which cluster storage(S3 vs. HDFS) should we use?
We know that EMR has the freedom to choose either HDFS or S3 as the persistent storage for the cluster.
HDFS as cluster persistent storage
When our cluster utilizes HDFS as its permanent storage, there are certain aspects that need to be taken into consideration:
- To ensure that our data is protected against loss in the event of a core node failure, we must always keep three copies of it.
- Since an EMR cluster is only ever deployed in a single Availability Zone (AZ) within a Region, any failure that affects the whole AZ might result in the loss of data.
- Our storage cost will vary depending on the EBS volumes we use since HDFS is constructed using the EBS volumes of the core nodes.
- Since the data is kept locally, the cluster needs to be accessible 24x7 even if there are no processes currently running that make use of the cluster’s capacity.
Amazon S3 as a persistent data storage
When we utilize Amazon S3 as the persistent storage layer, we gain a number of advantages, some of which are shown below:
- With S3 being a persistent storage, we get increased reliability as a result of S3’s multi-AZ replication.
- Our cluster is protected against the possibility of data loss as a result of a failed node, cluster, or AZ.
- Compared to EBS-based HDFS, S3 is substantially less expensive, which brings our total costs down.
- We are now able to terminate clusters when they are not in use and multiple clusters can point to the same dataset in S3 as a result of the decoupling of compute and storage.
Note: Amazon S3 places a limit on the number of write or read requests that may be processed in one second. We are able to do 3,500 GET/HEAD requests or 5,500 PUT/COPY/POST/DELETE requests per second in an Amazon S3 bucket for each prefix. There are no limits to the number of prefixes that we can have in our bucket. So while writing output, we may consider adding more S3 prefixes in order to prevent exceeding the maximum limit.
What is step execution?
A step is a unit of work we submit to the cluster. It’s optional. For instance, a step might contain one or more Hadoop or Spark jobs. We an also submit additional steps to a cluster after it is running.
There are various step types:
- Streming program
- Hive program
- Spark application
- Pig program
- Custom JAR
What is bootstrap actions?
Bootstrap actions are scripts that are executed on every cluster node during the setup process before Hadoop starts. We can use them to install additional software and customize our applications.
Comments